Creating your own wig can be a rewarding and creative process. Whether you’re doing it for personal use, a special event, or just to explore your crafty side, making a wig allows you to customize it to your exact specifications. Here’s a detailed guide on the materials you’ll need and the steps to follow.
Materials Needed
Hair
- Human Hair: Offers a natural look and can be styled with heat.
- Synthetic Hair: More affordable, but less versatile in terms of styling.
- Blended Hair: A mix of human and synthetic hair, combining benefits of both.
Wig Cap
- Lace Wig Cap: Provides a natural hairline.
- Standard Wig Cap: Easier to work with and less expensive.
Tools
- Mannequin Head: For constructing and styling the wig.
- T-Pins: To secure the wig cap to the mannequin head.
- Needle and Thread: For sewing the hair wefts onto the wig cap.
- Wig Stand: For stability while working on the wig.
- Comb and Brush: For detangling and styling.
- Scissors: For cutting and trimming the hair.
- Hair Clips: To section the hair while working.
Additional Supplies
- Wig Glue or Tape: For securing the wig to your head.
- Elastic Band: To ensure a snug fit of the wig.
- Hair Dye and Styling Products: If you want to color or style the wig.
Step-by-Step Guide
Step 1: Prepare Your Workspace
Set up your mannequin head on a stable wig stand. Gather all your materials and tools in one place to ensure an organized workspace.
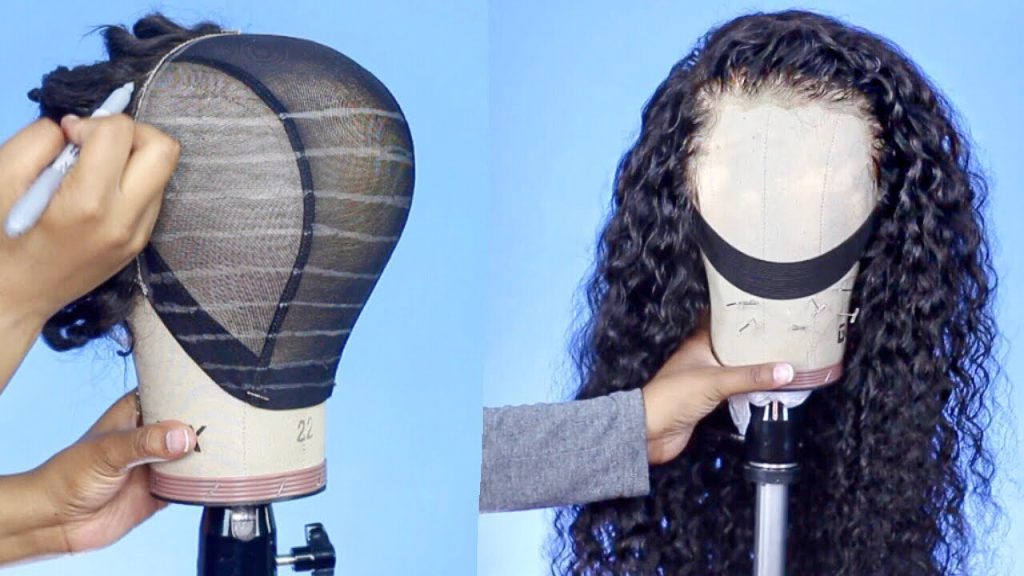
Step 2: Secure the Wig Cap
Place the wig cap on the mannequin head and secure it with T-pins. Ensure the cap is snug and properly aligned, especially around the hairline.
Step 3: Prepare the Hair Wefts
If using human hair or synthetic hair wefts, ensure they are clean and detangled. Measure the wefts against the wig cap to determine the length you’ll need for each section.
Step 4: Sewing the Hair Wefts
Start at the nape of the neck and work your way up:
- Thread the Needle: Use a strong thread, preferably matching the color of the wig cap.
- Sew the Wefts: Using a blanket stitch, sew the hair wefts onto the wig cap. Ensure the stitches are tight and secure.
- Layering: As you move upwards, layer the wefts closer together for a fuller look.
Step 5: Creating the Hairline
For a natural-looking hairline, use a lace front wig cap. Sew the hair in a way that mimics natural hair growth:
- Single Strands: Knot single strands of hair onto the lace for a realistic effect.
- Plucking: Pluck some hairs along the hairline to create a more natural appearance.
Step 6: Adding Elastic Band
Sew an elastic band inside the wig cap to ensure a snug fit. This will help the wig stay in place when worn.
Step 7: Styling the Wig
Once all the hair is sewn in, it’s time to style:
- Cutting and Trimming: Cut the wig to your desired length and style.
- Heat Styling: If using human hair or heat-resistant synthetic hair, you can curl or straighten it as desired.
- Dyeing: If you wish to color the wig, use hair dye suitable for the type of hair you’ve used.
Step 8: Final Touches
- Check Fit: Try the wig on and make any necessary adjustments.
- Secure: Use wig glue or tape to secure the wig to your head.
- Blend: Style the wig to blend seamlessly with your natural hairline.
Tips and Tricks
Choosing the Right Hair
- Quality Matters: Invest in high-quality hair for a more natural look and longevity.
- Match Your Style: Choose a hair type and color that suits your personal style and skin tone.
Maintenance
- Regular Cleaning: Wash your wig regularly with gentle shampoo and conditioner.
- Proper Storage: Store your wig on a mannequin head to maintain its shape.
Experiment with Styles
- Versatility: Don’t be afraid to experiment with different styles and colors.
- Accessorize: Add accessories like headbands, scarves, or clips to enhance your wig.
Making your own wig can be a fun and fulfilling project. With the right materials and a bit of patience, you can create a custom wig that perfectly fits your style and needs. Follow this guide step-by-step, and soon you’ll have a beautiful wig crafted by your own hands. Happy wig-making!
Recommended Reading
38 Braids Hairstyles for Young Women: Challenge Your New Style
Braids are one of the most common hairstyles. They can keep hair neat while reducing the discomfort caused by hair friction. By weaving the hair into [...]
48 Stunning 2 Braids Hairstyles Ideas
Two braids hairstyles feature two sections of hair braided separately, often starting from the crown and extending down the length of the hair. This style is [...]
21 Fantastic Butterfly Braids Hairstyles To Try
This hairstyle is a stunning example of butterfly braids. It's a long braid, adorned with golden hair cuffs, adding a touch of sparkle and [...]
35 Stunning Medium Box Braids Styles
Medium box braids are a dynamic and stylish choice for anyone looking to refresh their hairstyle. This guide delves deep into everything you need to know [...]
33+ Best Goddess Knotless Braids Ideas
Check out this stunning hairstyle featuring goddess knotless braids! These long, flowing braids cascade beautifully down, giving off a bohemian vibe. You can tell [...]
19+ New Fashionable Large Knotless Braids Hairstyles
Check out this stunning hairstyle! These are large knotless braids, also known as knotless box braids. They have a sleek, smooth look because there's no knot [...]
23 Stylish Trending Cornrows Braided Hair Styles For Curly Hair
Cornrows are a traditional African hairstyle that has been worn for centuries. This style involves braiding the hair very close to the scalp, creating continuous, raised [...]
24 Cornrows Braided Hairstyles For Women You’ll Be Dying to Try in 2024
Have you ever wondered about the story behind cornrows braided hairstyles? Well, let me take you on a journey through this fascinating and deeply rooted hairstyle. [...]
19 Hot Boho Braids Hairstyles You’ll Be Dying to Try in 2024
Hey there, beautiful souls! Today, I want to take you on a personal journey through the world of boho braids hairstyles. These enchanting, free-spirited hairdos are [...]
37+ Large & Big Knotless Braids Hair Styles
Knotless braids are a modern and versatile protective hairstyle that has gained immense popularity in recent years. Unlike traditional braids, knotless braids are created using a [...]
11 Knotless Goddess Braids Hairstyles With Curls
Goddess braids are a timeless, elegant hairstyle that has been embraced by many for its versatility and beauty. These braids are thicker than traditional cornrows, offering [...]
11 Cute Wig Hairstyles To Refine Your Personal Style
Wigs are a fantastic way to change up your look without the commitment of a haircut or dye job. Whether you're looking for something chic, playful, [...]
20 Top Frontal Wig Hairstyles ideas in 2024
Frontal wigs are a popular choice for those looking to achieve a natural and versatile look. These wigs feature a lace front that creates the illusion [...]
How to Trim Bangs on a Wig More Naturally?
Achieving a natural look with wig bangs can be tricky, but with the right techniques, it's totally doable. Whether you're rocking a full wig or just [...]
Unveiling the Allure of Raquel Welch Wigs: A Cut Above the Rest
In the ever-evolving world of wigs and hair extensions, one name stands out as a beacon of quality, innovation, and undeniable style – Raquel Welch. This [...]


